Tuesday 20 February 2018

Escape: Handcuffs and Shimming

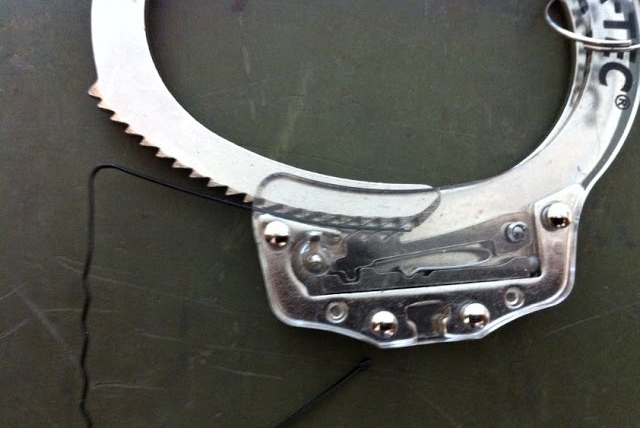
Today I am going to look at ways to bypass the single lock of handcuffs. To do this it will be necessary to briefly describe the mechanism we will be dealing with.
A typical pair of modern handcuffs uses a very simple mechanism. As you can see, the shackle/ strand (the moving part) has ratchet teeth. The teeth are engaged by the teeth on the pawl  (green part) within the mechanism. The pawl allows the shackle to move in but not be pulled out. In “single-lock” mode the handcuff can be tightened but not loosened. The handcuff key engages the pawl directly and lifts it up, disengaging the teeth and allowing the shackle to be opened. Note that the pawl is under spring tension so will drop if the pressure from the key is removed.
Above the pawl is a second mechanism (red). When this mechanism is engaged the handcuff is termed to be “double-locked” or “transport-locked”. When double-locked the pawl cannot rise, even if the correct key is used on it. The shackle of a double-locked handcuff can be neither tightened nor loosened. I will deal with double-locked cuffs in more detail in a future post. Today it is sufficient to understand that the techniques I will describe only work on single-locked cuffs, not those where the transport-lock is still engaged.
One way to unlock single-locked cuffs is to raise the pawl, mimicking the action of a standard key. For most cuffs this is relatively easy since the key has a simple flag without any cut-outs or other distinctive features. A variety of items can be used instead of a key. Bulldog clips, of the type that are triangular in section and have separate wire handles are very good for this. Obviously, these can be found in office environments or in desks. A desk can provide a prisoner with a variety of items that can be used for escape! Remove one handle and use the hooked end in the keyway of the cuff. Transparent training cuffs are very useful to have available when learning these techniques. Be careful of putting too much pressure on the plastic face of a training cuff and damaging the keyway.

The second technique for single-locked cuffs is shimming. This may be attempted when you do not have something to use as a key or when the keyhole is difficult to reach. Probably the best way to learn shimming is with a hair pin, aka bobby pin. Transparent training cuffs are very useful here.

Take a bobby pin and pull the protective blob from the end of the straight side. Open the pin out and give the straight side a slight curve. Slide the straight end of the pin along the top of the ratchet teeth on the shackle and into the housing. The pin can go no further when it is up against the pawl. You now need to push the shackle inward while also applying gentle pressure to the shim. This will obviously tighten the cuff but human wrists can take a measure of compression. If you do this correctly the pawl will raise and the shim will slide between it and the shackle before the pawl can descend again. If your shim is sufficiently inserted the teeth of the pawl and the shackle will be separated by the shim and cannot engage. Keep moderate pressure on the shim and you should be able to pull out the shackle.

The chief merit of shimming is that a variety of items you may have on your person or in your surroundings can be turned into shims. If you do not have a bobby pin then a paperclip or various bits of wire can be used in the same fashion. Shims do not need to be metallic. Strips of card or plastic may be suitable. Strips of aluminium soda can seem too flexible but this might be solved by folding them. The material used for the can ends is thicker. One way to use a piece of can as a shim is to fold it into an inverted U-section shape. This may not be practical if the shackle is a tight fit within the housing. It may not be possible to slip the material between the side of the shackle and the inner wall of the housing. A large plastic drinking straw may be used as a shim in the same fashion. Be careful when handling strips of soda can. You can easily cut your fingers and the blood may make your escape attempt more problematic.

If you carry an escape kit then including some purpose-built shims is prudent. Some users carry quite a variety but in reality you need two types at most, with perhaps a bobby pin or wire for very narrow cuffs.

Commercially available shims tend to come in two forms. There are standard shims and “split” shims that have a notch in one end. Some handcuffs have obstructions intended to prevent shimming and the notched shim is supposed to counter this. The commercial notched shims I have seen only have a notch of a few millimetres depth. Some high security cuffs have obstructions that seem to be deeper than this.

Most commercial shims are made of steel. Some websites specify stainless steel but very few also provide the information as whether the stainless steel used is also non-magnetic. For an item such as a shim that you may want to conceal a low magnetic signature is an attractive feature.
While I was pondering this problem I discovered the turning tools I had made from laboratory spatulas were not magnetic!
Like many items of scientific equipment, lab spatulas are often subject to massive mark-ups. Price may vary fiftyfold so shop around.
The spatula is slightly over 3.5mm width so needs to be narrowed down a little for use as a shim. Round the corners and bevel the ends a little while you are working on it. I chose to slot one end. I used the cut-off wheel of a Dremel for this, which is probably not the best (nor the safest!) tool for the job. Not the neatest job I have ever done but sufficient for illustrative purposes. Use abrasive paper on the shim to polish it and remove any rough edges. The shim should have a slight curve. Passing it through a handcuff’s mechanism a few times creates this.
 
I don’t currently have any cuffs with anti-shimming features to test this shim against. It works very well on the training cuff and both the bifurcated and non-bifurcated ends can be used with this. The length of this shim lets me insert it across the full width of the cuff. This results in the handcuffs looking like they are secure but capable of being pulled open when desired.
Some cuffs use a narrower shackle as an anti-shimming measure so perhaps the non-bifurcated end should be narrowed even further. This would result in a tool that has an elongated Y-shape or that resembles a very slim tuning fork!

Many thanks to Shomer-tech for providing me with the transparent training cuff.

If you have enjoyed this article or it has been helpful to you please feel free to show your appreciation. Thank you.

http://www.angelfire.com/art/enchanter/epsdbook.html
http://www.lulu.com/shop/http://www.lulu.com/shop/phil-west/survival-weapons-optimizing-your-arsenal/paperback/product-21488758.html
http://www.lulu.com/shop/phil-west/crash-combat/paperback/product-22603842.html
https://www.amazon.com/Anatopismo-Underrealm-Novella-Phil-West-ebook/dp/B077G7MMFM

Sunday 18 February 2018

Escape Introduction

In a certain adventure series I watch one or both of certain events are likely to happen every few episodes.

The first is that the protagonists are likely to find themselves deep in dark woods with no phone reception.

The second is that one or both of them will be knocked out and wake up tied up somewhere, usually with a gloating adversary.

You’d think that they might consider investing in a pair of satphones, or some other alternate communication options. Investing in some counter custody equipment would also be logical.

Escape and Evasion (E&E) is not just something for action heroes and spies. Many of us are more at risk than we realize. I can think of at least two people that I know who have been victims of illegal abduction. Neither were wealthy. In one case the motive was rape. Fortunately both incidences ended happily, except for the would be rapist, and I have no problem with that result.

Today’s blog is an introduction to a series of forthcoming posts on the topic of escape.

An abductee may face confinement and/or restraint. I have already addressed confinement to some degree with the articles on lock picking. Lock picking is a non-destructive technique and if you are illegally confined you should have no qualms about damaging property if it allows you to escape.

This blog has also looked at some methods against physical restraint, most recently with an article on escaping zip-ties. For convenience let us divide physical restraint into four broad categories.

The first of these is restraint using cordage. This may be rope, leather thongs, string, wire or a variety of similar items. Here your main options are cutting the cord or undoing the knots. The practicality of each very much depends on the materials used and how you have been tied. Your teeth can be used to chew cord or manipulate the knots. If you cannot reach your own bindings you may be able reach those of a companion. Hands may be restrained before or behind you so any escape gear you carry should be accessible from either posture. Look for edges that you can abrade the cordage against. Look for objects in the locality you can break to create cutting edges. Items such as lighters can be used to burn through bindings.

Once you are free do not neglect the potential of the remaining cordage as a tool or weapon to further aid your escape.

The second class of restrain is that using chains and manacles. In the modern world the most commonly encountered of this category are handcuffs. Such restraints are much harder to break or cut. There are ways to bypass or damage the mechanisms, however. Ways to deal with handcuff restraint will be detailed in forthcoming posts. I’ll be assessing the merits of some of the commercial products offered.

A more recent category of restraint is the use of adhesive tape such as duct tape. I have looked at ways to break such restraints in a previous post. Many of the techniques suggested for use against cordage can also be applied to tape, with the obvious exception that there are no knots to attack. Your location may include organic solvents that can be used to weaken the adhesive. Possible sources include petrol, brush cleaner, paint thinner, stove fuel, nail polish remover, alcohols and similar.

The last category is that of zip-ties and similar devices. A variety of techniques against these have been covered in previous posts. Future blogs will look at some of the tools you may use to apply such techniques.
 
If you have enjoyed this article or it has been helpful to you please feel free to show your appreciation. Thank you.
The Books

http://www.angelfire.com/art/enchanter/epsdbook.html
http://www.lulu.com/shop/http://www.lulu.com/shop/phil-west/survival-weapons-optimizing-your-arsenal/paperback/product-21488758.html
http://www.lulu.com/shop/phil-west/crash-combat/paperback/product-22603842.html
https://www.amazon.com/Anatopismo-Underrealm-Novella-Phil-West-ebook/dp/B077G7MMFM


Wednesday 7 February 2018

POW Manual Alphabet

I found this while I was researching the tap code. In addition to the tap code the advice to potential prisoners had another form of manual alphabet.

If you have enjoyed this article or it has been helpful to you please feel free to show your appreciation. Thank you.
The Books

http://www.angelfire.com/art/enchanter/epsdbook.html
http://www.lulu.com/shop/http://www.lulu.com/shop/phil-west/survival-weapons-optimizing-your-arsenal/paperback/product-21488758.html
http://www.lulu.com/shop/phil-west/crash-combat/paperback/product-22603842.html
https://www.amazon.com/Anatopismo-Underrealm-Novella-Phil-West-ebook/dp/B077G7MMFM

Monday 5 February 2018

Good Advice from Kephart.

Let us start the week with more wise words from Horace Kephart. Advice as good today as it was nearly a century ago.

“Carry a change of underwear. When on a hike, take your bath or rub-down at close of day, instead of in the morning; then change to fresh underwear and socks, and put on your sweater and trousers to sleep in. Fresh dry underclothes are as warm as an extra blanket would be if one slept in the sweaty garments he wore during the day—to say nothing of cleanliness.”

Camping and Woodcraft 1927 Vol.2 p.100.

         If you have enjoyed this article or it has been helpful to you please feel free to show your appreciation. Thank you.
The Books

http://www.angelfire.com/art/enchanter/epsdbook.html
http://www.lulu.com/shop/http://www.lulu.com/shop/phil-west/survival-weapons-optimizing-your-arsenal/paperback/product-21488758.html
http://www.lulu.com/shop/phil-west/crash-combat/paperback/product-22603842.html
https://www.amazon.com/Anatopismo-Underrealm-Novella-Phil-West-ebook/dp/B077G7MMFM

Friday 2 February 2018

Underwear for Survival.

Recently I came across another reference to American Civil War (ACW) “Foot Cavalry”. As has been noted in other posts, many infantry in this conflict became adept at moving fast and light. John Worsham’s account of the war as part of Jackson’s brigade is worth a read. So too is John D. Billings' memoir, Hardtack and Coffee, I'm told. Many of the lessons that they learned and techniques that they practiced have been generally ignored in more recent times. In previous posts we saw how such soldiers reduced their sleeping gear to a blanket, gum-blanket or oilcloth and perhaps a shelter half. Their food and eating equipment occupied a foot square haversack. Knapsacks were often discarded and what little they did not wear was rolled up inside a blanket. Such a blanket might contain little more than a spare shirt, socks, a nightcap and perhaps spare underwear. Some cordage, a sewing kit, tobacco and a bible might complete the load.
One advantage these soldiers had was that their jacket and trousers were of wool, which stays warm if wet and dries more readily than cotton. Some garments were “jean cloth” –a mixture of wool and cotton. Wikipedia has some silly comments about woollen uniforms, failing to appreciate that woollen cloth need not be the thick, heavy stuff used for modern winter clothing. Woollen uniforms were used by most armies until after the Second World War when the printing of camouflage patterns favoured switching to cotton.
Long frock coats were the current military fashion at the time of the ACW but the majority of soldiers opted for either sack coats or shell jackets. The sack coat was originally issued as fatigue wear. It was longer than a shell jacket but generally not as long as the civilian garments called sack coats. The shell jacket was a waist-length garment and was favoured by troops that rode. Union infantry seem to have favoured the sack coat while the Confederacy mainly issued shell jackets, probably as an economy measure. Pragmatically the Confederacy allowed trousers to be blue, brown or grey.

Greatcoats were also used and this article has instructions on how to fold one to fit in the knapsack. If the knapsack was not being worn the coat was presumably rolled in the blanket roll or carried in the company baggage until weather was cold enough for them to be needed. Presumably, many soldiers simply wore their blanket as a cloak if it was chilly. Billings tells us some soldiers discarded their blanket in favour of the coat.

It is what these soldiers wore under their uniforms that is of interest to the modern outdoorsman. At this period, shirts were regarded as an inner or underwear garment more than they are now. You might have seen soldiers in shirtsleeves, but wearing a shirt as the outermost layer was much less common. Shirts might be woollen, cotton or linen. They might be issue items or civilian in origin. Many shirts were sent from home and homemade. Typically a shirt would be of the pull-over type with a buttoned opening reaching part way down. Such shirts were also thigh-length. One reason for this length is that a shirt would also serve a soldier as a nightshirt. Nearly a century later Rommel’s Afrika Korps were also issued long shirts so they could sleep in them. Another reason for the long shirttails was that many men in the ACW period did not wear underpants. Instead they would tuck their shirt tails between their legs, a practice that dates back to at least the middle ages. More than one shirt might be worn. A letter from a soldier asks his family to send him four woollen shirts, two of thin wool that can be used as undershirts.

While researching this article I came across this facebook group detailed the contents of a British soldier’s blanket roll in 1776. Three shirts were carried, one worn, two packed, and men ordered to “change their linnen three times a week”.

A recent military innovation of the ACW period was the issue of drawers. Many soldiers had never encountered such things in civilian life and it was considered good sport to try to convince a newbie that these were parade trousers that he should wear. The drawers issued were ankle-length and made of a cotton flannel, hardwearing on the outside and soft on the inner face. The use of cotton is perhaps a little surprising, given that cotton is cold when wet and slow to dry. In a previous post we saw that the WW2 Soviet soldier wore long cotton underwear, but this was presumably for easy processing through the field laundry. One presumes laundry for a civil war soldier was more personal or ad hoc. Perhaps there is something about the combination of cotton drawers under wool trousers that I am missing. One advantage of cotton is that it could be boiled to kill lice, ticks and fleas. Wearing two pairs of drawers might be done in cold weather or when riding. When drawers were worn the long shirt tails probably provided an additional protection against chaffing.

Worsham mentions Many wore around their waists, next to their skin, a flannel belt or worsted string, to prevent bowel complaint”. This may be a reference to the “kidney warmers” favoured by Germans (and Japanese!) and presumably those of German descent, as many Americans were. Incidentally, “kidney warmers” were another component of Afrika Korps uniform. A future blog will discuss kidney warmers. They seem a useful addition to your cold weather gear.

Laundering seems to have been an issue for civil war soldiers. New or clean underwear seems to have been a cherished spoil of war. There are even accounts of soldiers redressing during battles.

On the subject of cotton underwear vs woollen we can look to James Austin Wilder and Horace Kephart, several decades later. In “Jack-Knife Cookery” Wilder advises scouts to wear “light woolen athletics”, even in summer. Kephart (Camping and Woodcraft 1927) informs us:

 However, the broad statement that one should wear nothing but wool at all seasons requires modification. It depends upon quality and weave.

Some (wool) flannels are less absorptive and less permeable (especially after a few washings by the scrub-and wring-out process) than open-texture cottons and linens.”

“If woolen garments are washed like cotton ones-soap rubbed in, scrubbed on a washboard or the like, and wrung out — they will invariably shrink. The only way to prevent shrinkage is to soak them in lukewarm suds (preferably of fels-naphtha or a similar soap), then merely squeeze out the water by pulling through the hand, rinse, squeeze out again, stretch, and hang up to dry. This is easy, but it requires a large vessel, and such a vessel few campers have.”

“Drawers must not be oversize, or they will chafe. But one’s legs perspire much less than his body, and need less protection; so, up to the time of frost, let the drawers be of ribbed cotton, which is permeable and dries out quickly. Cotton drawers have the further advantage that they do not shrink from the frequent wettings and constant rubbings that one’s legs get in wilderness travel. Wool, however, is best for wading trout streams. For riding, the best drawers are of silk.

I conclude that for cold weather, for work in high altitudes where changes of temperature are sudden and severe, and for deep forests where the night air is chilly, woolen underclothes should be worn. In hot climates, and for summer wear in open country, a mixture of silk and wool is best, but open-texture linen or cotton does very well. Pajamas should be of flannel, at all seasons, if one sleeps in a tent or out-of-doors.”

“Drawers must fit snugly in the crotch, and be not too thick, or they will chafe the wearer. They should be loose in the leg, to permit free knee action. Full-length drawers are best because they protect the knees against dirt and bruises, and safety-pins can be used to hold up the socks (garters impede circulation).”

In his 1906 edition, “The Book of Camping and Woodcraft” he comments:

 “It is unwise to carry more changes of underwear, handkerchiefs, etc., than one can comfortably get along with. They will all have to be washed, anyway, and so long as spare clean ones remain no man is going to bother about washing the others. This means an accumulation of soiled clothes, which is a nuisance of the first magnitude.”

What does all this mean to the modern outdoorsman or serviceman? There are obvious advantages to having your field gear of wool but this can be a little hard to achieve in modern times. Woollen garments tend to be expensive and may be too heavy or too warm for all-season wear. Items can be found on Army surplus sites, often of Swedish or Finnish origin.  Reenactor suppliers can also yield suitable garments, be they medieval, ACW or 20th century. Prices are often high but some companies do offer budget items. I have come across ACW sack coats for about $60, which is not bad if you are happy with either grey or blue. Viking/ LARP/ medieval tunics can be found for similar prices and these may actually be more practical items for field wear.


Below is a wool/ polyamid tunic that incorporates printed camouflage components. This suggests how a monocolour woolen garment might be customized.
It is worth noting here that Kephart favoured a cotton flannel or chambray shirt as his outer garment over gauze woollen underclothing. Trousers were either cotton moleskin or wool kersey. Kephart notes that:

The material and quality of one’s underwear are of more consequence than the shell he puts over it, for his comfort and health depend more on them.”

Obviously long undergarments can improve our comfort when away from our centrally-heated and air-conditioned buildings.

A common theme we have seen is that woollen undergarments should be light and of open weave. Kephart and Wilder both advocated that in winter wearing two sets of summer-weight woollen undergarments was preferable over one heavier layer. Most of the woollen undergarments that can be found nowadays are designed for winter use and too warm for all-season use. Long underwear of synthetic materials are also mainly designed as “thermals” for when the mercury drops.

For the upper body we can get by with one or more layers of thin shirts, tee-shirts or long-sleeved tee-shirts. The Spetznaz use of string vests is worth recalling here. Coolmax is a synthetic that is soft, fast drying but not overly warm. I have used a coolmax tee-shirt on several of my travels, including a visit to humid Hong Kong. I didn’t care about getting drenched in the heavy rain since the garment would dry off so quickly when the temperature rose afterwards.

For the legs most of the long underwear commonly available is likely to prove too warm for all-season wear. String long johns seem to cost ten times the price of a string vest! One solution may be to repurpose some pyjama bottoms as long field drawers. Brushed cotton, cotton flannel and soft polycottons should all prove suitable. Just make sure the fit around the loins is sufficient to prevent chaffing. The pyjama top can serve as a shirt, if pattern and colour allow.

My female readers may have guessed the second suggestion, which is to use pantyhose/ tights as an inner layer. Many horse riders know the benefit of these against chaffing. You can even get tights specifically designed for men, some more so than others! Tights/ leggings in coolmax can be found and I am considering acquiring some.
If you have enjoyed this article or it has been helpful to you please feel free to show your appreciation. Thank you.
The Books

http://www.angelfire.com/art/enchanter/epsdbook.html
http://www.lulu.com/shop/http://www.lulu.com/shop/phil-west/survival-weapons-optimizing-your-arsenal/paperback/product-21488758.html
http://www.lulu.com/shop/phil-west/crash-combat/paperback/product-22603842.html
https://www.amazon.com/Anatopismo-Underrealm-Novella-Phil-West-ebook/dp/B077G7MMFM